How to set up WireGuard on Debian 12
Introduction
WireGuard is a straightforward yet fast and modern VPN that utilizes state-of-the-art cryptography. It aims to be faster, simpler, leaner, and more practical than IPsec while avoiding the massive headache. It intends to be considerably more performant than OpenVPN. WireGuard is designed as a general-purpose VPN for running on embedded interfaces and supercomputers alike, and it is fit for many different circumstances.
Step 1. Installing WireGuard and generating a key pair
The first step is to install WireGuard on your server. Before starting, update your WireGuard server’s package index and install WireGuard using the following command.
apt-get update && apt-get install wireguardNow that you have WireGuard installed, the next step is to generate private and public key pairs for the server using the following command.
Create the private key for WireGuard and change its permissions using the following command:
wg genkey | tee /etc/wireguard/private.key && chmod go= /etc/wireguard/private.keyThe next step is to create the corresponding public key derived from the private key. Use the following command to create the public key file:
cat /etc/wireguard/private.key | wg pubkey | tee /etc/wireguard/public.keyStep 2. Choosing IPv4 addresses
If you are using your WireGuard server with IPv4 peers, the server needs a range of private IPv4 addresses for clients and its tunnel interface. You can choose any range of IP addresses from the following reserved blocks of addresses (if you would like to learn more about how these blocks are allocated, visit the RFC 1918 specification):
10.0.0.0        -   10.255.255.255  (10/8 prefix)
172.16.0.0      -   172.31.255.255  (172.16/12 prefix)
192.168.0.0     -   192.168.255.255 (192.168/16 prefix)
Step 3. Creating a WireGuard server configuration
Once you have the required private key and IP address, create a new configuration file using nano or your preferred editor by running the following command:
nano /etc/wireguard/wg0.confAdd the following lines to the file. Don’t forget to add the private key generated in your WireGuard server and the IP address on the Address line. You can also change the ListenPort line if you would like WireGuard to be available on a different port:
[Interface]
Address = 10.8.0.1/24
SaveConfig = true
ListenPort = 51820
PrivateKey = private_key
Step 4. Starting the WireGuard server
WireGuard can be configured to run as a systemd service using its built-in wg-quick script. While you could manually use the wg command to create the tunnel every time you want to use the VPN, doing so is a manual process that becomes repetitive and error-prone. Instead, you can use systemctl to manage the tunnel with the help of the wg-quick script.
Using a systemd service means you can configure WireGuard to start up at boot so that you can connect to your VPN anytime as long as the server is running. To do this, enable the wg-quick service for the wg0 tunnel that you’ve defined by adding it to systemctl:
systemctl enable [email protected]Now start the service:
systemctl start [email protected]Double-check that the WireGuard service is active using the following command. You should see active (running) in the output:
systemctl status [email protected]Command output:
● [email protected] - WireGuard via wg-quick(8) for wg0
     Loaded: loaded (/lib/systemd/system/[email protected]; enabled; preset: enabled)
     Active: active (exited) since Tue 2024-03-19 17:27:52 CET; 2min 39s ago
       Docs: man:wg-quick(8)
             man:wg(8)
             https://www.wireguard.com/
             https://www.wireguard.com/quickstart/
             https://git.zx2c4.com/wireguard-tools/about/src/man/wg-quick.8
             https://git.zx2c4.com/wireguard-tools/about/src/man/wg.8
    Process: 1190 ExecStart=/usr/bin/wg-quick up wg0 (code=exited, status=0/SUCCESS)
   Main PID: 1190 (code=exited, status=0/SUCCESS)
        CPU: 65ms
Step 5. Configuring a WireGuard peer
Configuring a WireGuard peer is similar to setting up the WireGuard Server. Before starting, firstly install client software.
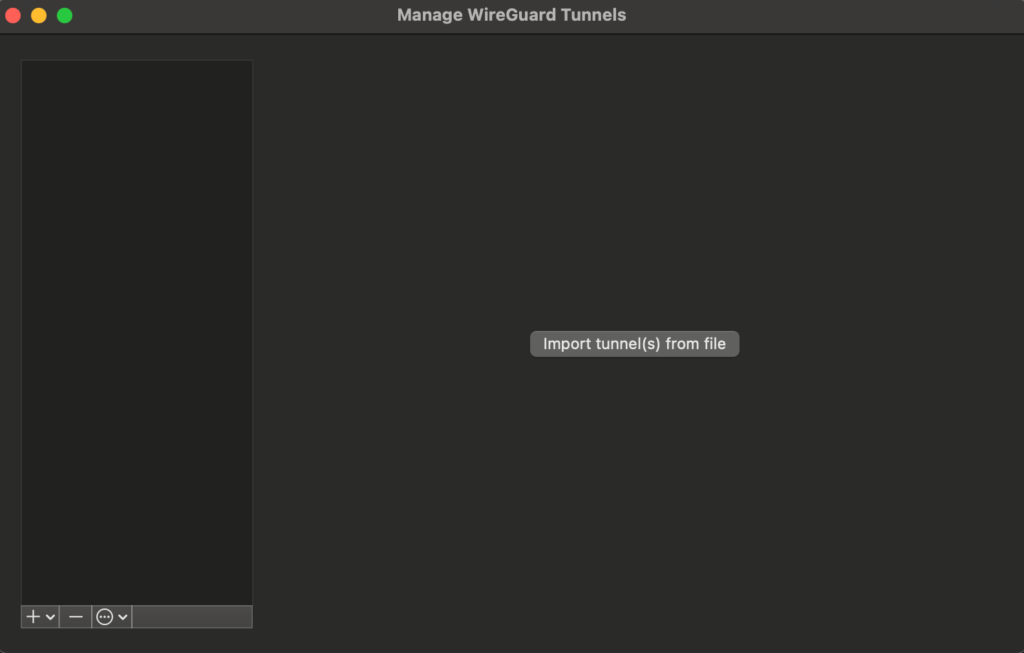
You can now set up your first connection by clicking the “+” button and selecting “Add Empty Tunnel.”
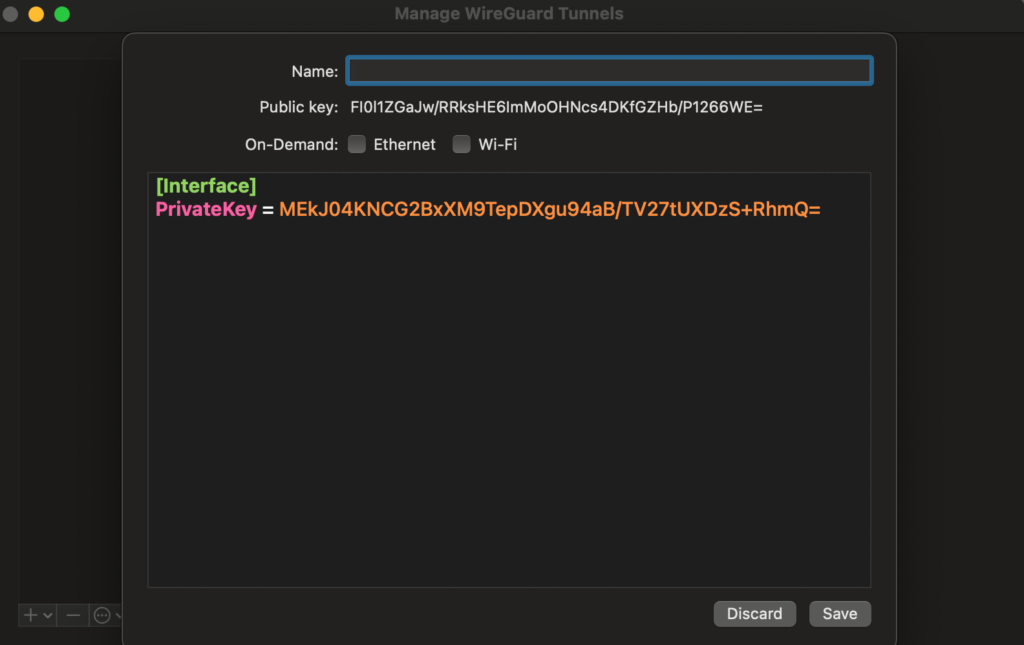
In the opened window, we must fill in additional information like our name and save the public key for our WireGuard server. In the text area, we need some information that allows us to connect to our WireGuard server.
[Interface]
PrivateKey = peer_private_key
Address = 10.8.0.2/24

[Peer]
PublicKey = wire_guard_server_public_key
AllowedIPs = 10.8.0.0/24
Endpoint = wire_guard_server_ip_address:51820
Interface section:
PrivateKey – the base 64 encoded private key generated on the peer.
Address – your IP address for your peer.
Peer section:
PublicKey – the base 64 encoded public key from the WireGuard server.
AllowedIPs – the IP address range that you defined on the WireGuard server.
Endpoint – the WireGuard server IP address and port.
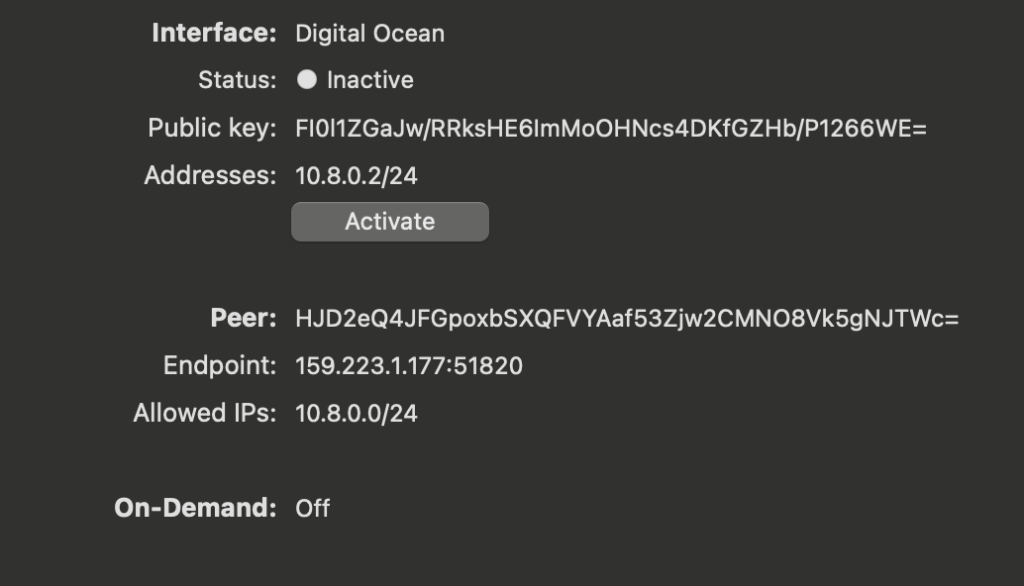
After that, click the button save and save this configuration on your MacBook.
Step 6. Adding the peer’s public key to the WireGuard server
Before connecting the peer to the server, adding the peer’s public key to the WireGuard server is essential. This step ensures you can connect to and route traffic over the VPN. Without completing this step, the WireGuard server will not allow the peer to send or receive any traffic over the tunnel.
Now log into the WireGuard server and run the following command:
wg set wg0 peer peer_public_key allowed-ips 10.8.0.2Once you have run the command to add the peer, check the status of the tunnel on the server using the wg command:
wgOutput of the command
interface: wg0
  public key: 5eXbx9Z8YUjJmmj43xNpQROs+xVPmcxCOC7gMyrnTGk=
  private key: (hidden)
  listening port: 51820

peer: FI0l1ZGaJw/RRksHE6ImMoOHNcs4DKfGZHb/P1266WE=
  allowed ips: 10.8.0.2/32
Notice how the peer The line shows the WireGuard Peer’s public key and the IP addresses or ranges of addresses it can use to assign itself an IP. Now that you have defined the peer’s connection parameters on the server, the next step is to start the tunnel on the peer.
Step 7. Connecting the WireGuard peer to the tunnel
Now you can connect the WireGuard peer to the tunnel by clicking “Activate.”
Now you can ping your IP address, for example:
ping 10.8.0.1
PING 10.8.0.1 (10.8.0.1): 56 data bytes
64 bytes from 10.8.0.1: icmp_seq=0 ttl=64 time=68.325 ms
64 bytes from 10.8.0.1: icmp_seq=1 ttl=64 time=90.643 ms
64 bytes from 10.8.0.1: icmp_seq=2 ttl=64 time=99.050 ms
^C
--- 10.8.0.1 ping statistics ---
3 packets transmitted, 3 packets received, 0.0% packet loss
round-trip min/avg/max/stddev = 68.325/86.006/99.050/12.965 ms
Conclusion
Today we installed the WireGuard server and tried to connect our MacBook to the WireGuard VPN network.
Sources: